
In December MaxMind released the new GeoLite web services, an IP geolocation API available free of charge.
IP geolocation services provide information about the geographic location of an IP address. MaxMind offers such free web services, GeoLite City and GeoLite Country, which are comparable to, but less accurate than, MaxMind’s paid GeoIP City Plus and GeoIP Country web services. GeoLite is fully compatible with GeoIP, using the same API and integration method, making it easy to switch between the free and paid services as your needs change. You can compare accuracy of the GeoLite and GeoIP web services by selecting a country on the GeoIP City Accuracy page.
In this blog post, we are going to review how to build a simple web page in PHP that uses GeoLite City. We will learn how to easily upgrade to the paid GeoIP City Plus web service, for greater accuracy and unlimited queries (GeoLite web service users are limited to 1,000 queries per day).
A Warning About Precision
Before we dive in, you should be aware that IP geolocation is inherently imprecise. When MaxMind provides longitude and latitude, the coordinates provided are often near the center of the population. Any location provided by a GeoIP database should not be used to identify a particular address or household. IP geolocation is used to give you an idea of the region, sometimes down to the level of city or postal code, but it can’t pinpoint the source of an internet connection. To help you have a sense of how precise any given query return is, MaxMind provides an accuracy radius field in the response. The actual location of the IP address is likely within the area defined by a circle with its center at the coordinates returned and a radius equal to the accuracy radius returned.
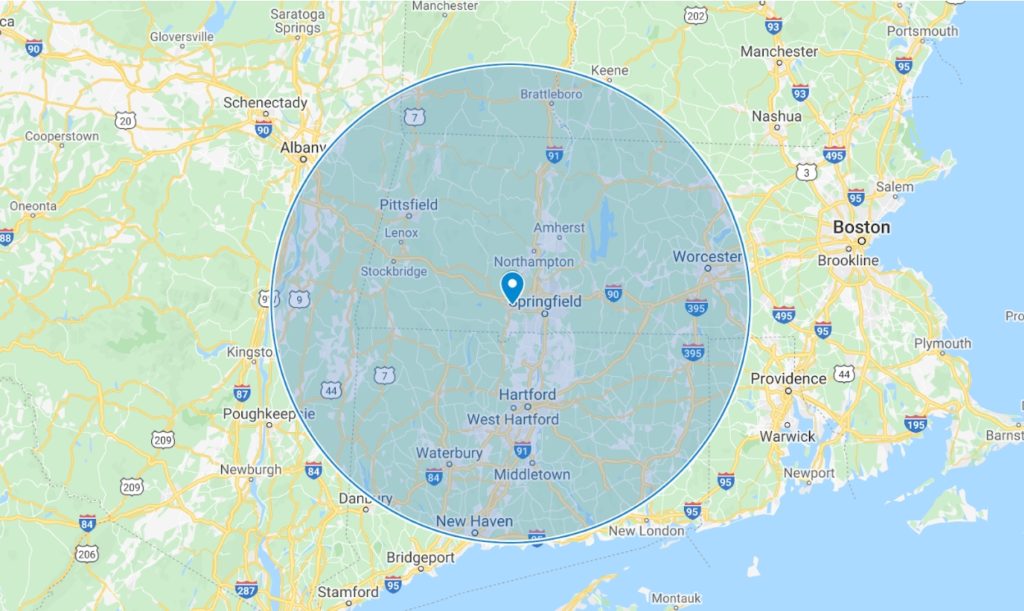
In the example above, MaxMind returns the coordinates 42.1293, -72.7522 with an accuracy radius of 100km. The actual geolocation of the IP address is likely within the 100km-radius circle shown above.
Okay, let’s get started!
Requirements
- A clone of the repository
used in this code. This requires
gitto be installed. - A PHP version >= 7.2 must be installed.
- Composer must be installed. Composer will help you manage the dependencies required to integrate with GeoLite.
- A free MaxMind GeoLite account with a license key is required.
- If you already have a MaxMind account and have signed up for GeoLite, you can generate a new license key here (login required) or use your existing one.
- If you have a MaxMind account but haven’t signed up for GeoLite, you can do so here (login required).
- If you don’t have a MaxMind GeoLite account, you can sign up for one here.
Using Docker or Vagrant
The code repository comes with a Dockerfile and a Vagrantfile included. If you’d like to begin work in an environment which has all of the necessary software dependencies pre-installed, see our documentation for getting started with Docker and Vagrant.
GeoLite City Web Services
The GeoLite City web services return information about a provided IP address, such as its city, subdivision, postal code, country, continent, and approximate latitude and longitude. For example, when I look up my IP address (i.e., provide it in an API call to the web service), the service returns the city that I live in, my province, my postal code, my country, and the circle containing my estimated latitude and longitude, as well as a number of other fields describing my IP address.
The GeoLite Country web service returns, among other things, the country and continent in which an IP address resides. GeoLite Country responses are strictly a subset of GeoLite City responses, as is the case with GeoIP Country and GeoIP City Plus.
It is important to note that the web services do not always return every field for every IP address. Some information is unavailable and some information is not applicable (e.g., if I look up the IP address 8.8.8.8, which is a Google Anycast address, it doesn’t make sense to return a precise location, since the IP address has locations all over the world). In these cases MaxMind will return the subset of the fields for which there is data.
The Demo in Action
Let’s take a look at the demo application we’re going to write today. Here is a screenshot of a web browser where I use the demo application to look up the IP address 146.243.121.22.
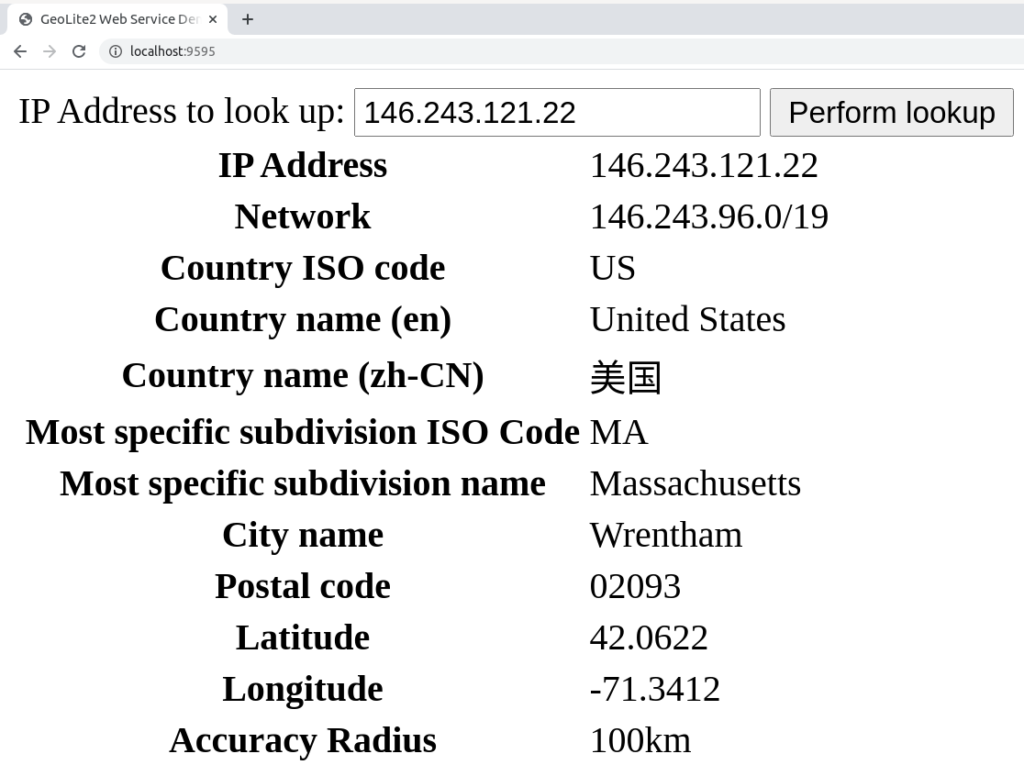
It’s pretty simple: I provide an IP address in the “IP address to look up” field, hit the “Perform lookup” button, and then I get the information returned about the IP address and rendered in the browser.
Now let’s look at the code and how to implement it.
Implementing the Demo
The repository for this post is available on GitHub. To clone it open a terminal to a directory of your choosing and run the following command:
1git clone https://github.com/maxmind/geolite2-ws-blogpost.git
Now we’ll have the code in the directory geolite2-ws-blogpost directly under
our current directory. Next we change the directory to that.
1cd geolite2-ws-blogpost
Next we install Composer as a PHAR. See the instructions here.
Once we’ve installed Composer, we tell it to install the GeoIP2 client API:
1php composer.phar require geoip2/geoip2:~2.0
Now we start the server. This requires a MaxMind account ID and license key. You
can use an existing, stored, license key or
generate a new one in your account portal.
Be careful with this key – you don’t want it getting out in the wild or else
anyone can use it to use up your MaxMind credit! See
this link
for instructions on how to safely store your license key – in particular, don’t
commit the key to any repository. Once you’ve obtained your account ID and
license key, replace YOURACCOUNTID with the account ID and YOURLICENSEKEY
with the license key in the following command and run:
1MM_ACCOUNT_ID=YOURACCOUNTID MM_LICENSE_KEY=YOURLICENSEKEY php -S 0:9595
Now your webserver is running, and you can access http://localhost:9595 in
your web browser and you should see the web form in which you can perform a
lookup. Enter an IP address, or the special keyword me to look up your own IP,
hit the “Perform lookup” button, and away we go!
The Code Explained
Let’s take a look at the code inside index.php.
The first few lines are as follows:
 1<!doctype html>
 2<html>
 3
 4<head>
 5    <title>GeoLite Web Service Demo</title>
 6</head>
 7
 8<body>
 9
10    <?php
11    function h($input)
12    {
13        return htmlspecialchars($input, ENT_QUOTES | ENT_HTML5, 'UTF-8');
14    }
15    ?>
16
17    <form method="POST">
18        <label>
19            IP Address to look up:
20            <input type="text" name="ip_address" value="<?= isset($_POST['ip_address']) ? h($_POST['ip_address']) : 'me' ?>">
21        </label>
22
23        <input type="submit" value="Perform lookup">
24    </form>
There are two things here: One is simply the start of a web page that outputs a
form that we can submit to perform the lookup, and the other is a reusable
function, h, which escapes HTML control characters, preventing injection (see
this link for more information).
For more information on how to build web forms, you can look up HTML and PHP
tutorials.
The core of the execution, making a lookup against the API, comes next:
 1<?php
 2require_once 'vendor/autoload.php';
 3
 4use GeoIp2\WebService\Client;
 5
 6if ($_SERVER['REQUEST_METHOD'] == 'POST' && isset($_POST['ip_address']) && $_POST['ip_address']) {
 7    // This creates a Client object that can be reused across requests. To
 8    // use GeoIP2 instead of GeoLite2, you can remove the last two
 9    // parameters in the client constructor, that is the arrays containing
10    // both the locale and the host.
11    $client = new Client(
12        getenv('MM_ACCOUNT_ID'),
13        getenv('MM_LICENSE_KEY'),
14        ['en'],
15        ['host' => 'geolite.info']
16    );
17
18    // You can replace "city" with the method corresponding to the web
19    // service that you are using, e.g., "country".
20    $record = $client->city($_POST['ip_address']);
21?>
The first line, with the require_once, tells Composer to do its thing and make
the GeoIP2 client available for use in our application.
The next non-blank line, with the use GeoIp2\WebService\Client; makes it so
that we can refer to the GeoIP2 client by referring to Client instead of its
fully-qualified name.
The if statement has a condition that says if the request method is POST
(i.e., if someone has submitted the form), and the IP is set, and it’s not
blank, perform the lookup. You can find more details about the GeoIP2 client API
on GitHub and in the current-as-of-this
writing
API client documentation.
Here, we instantiate a GeoIP2 client using the host parameter geolite.info,
which is used to specify that we wish to use the GeoLite web services, and use
that client by calling its city method to perform the lookup.
Next, within the same if block, we render the results of our lookup and close
the block:
 1<table>
 2    <tr>
 3        <th>IP Address</th>
 4        <td><?= h($record->traits->ipAddress) ?></td>
 5    </tr>
 6    <tr>
 7        <th>Network</th>
 8        <td><?= h($record->traits->network) ?></td>
 9    </tr>
10    <tr>
11        <th>Country ISO code</th>
12        <td><?= h($record->country->isoCode) ?></td>
13    </tr>
14    <tr>
15        <th>Country name (en)</th>
16        <td><?= h($record->country->name) ?></td>
17    </tr>
18    <tr>
19        <th>Country name (zh-CN)</th>
20        <td><?= h($record->country->names['zh-CN']) ?></td>
21    </tr>
22    <tr>
23        <th>Most specific subdivision ISO Code</th>
24        <td><?= h($record->mostSpecificSubdivision->isoCode) ?></td>
25    </tr>
26    <tr>
27        <th>Most specific subdivision name</th>
28        <td><?= h($record->mostSpecificSubdivision->name) ?></td>
29    </tr>
30    <tr>
31        <th>City name</th>
32        <td><?= h($record->city->name) ?></td>
33    </tr>
34    <tr>
35        <th>Postal code</th>
36        <td><?= h($record->postal->code) ?></td>
37    </tr>
38    <tr>
39        <th>Latitude</th>
40        <td><?= h($record->location->latitude) ?></td>
41    </tr>
42    <tr>
43        <th>Longitude</th>
44        <td><?= h($record->location->longitude) ?></td>
45    </tr>
46    <tr>
47        <th>Accuracy Radius</th>
48        <td><?= h($record->location->accuracyRadius) ?>km</td>
49    </tr>
50</table>
51<?php
52}
53?>
Finally, we end the HTML page and our script is complete:
1</body>
2
3</html>
Upgrading to the GeoIP City Plus Web Service
In order to upgrade to the GeoIP City Plus web service, we have to
purchase credit for our
MaxMind account and be approved for service. Once our account has been approved
for GeoIP, we remove the locale and host parameters from the constructor, where
we’ve previously defined the host used for the lookups to be geolite.info.
1// This creates a Client object that can be reused across requests. To
2// use GeoIP2 instead of GeoLite2, you can remove the last two
3// parameters in the client constructor, that is the arrays containing
4// both the locale and the host.
5$client = new Client(
6    getenv('MM_ACCOUNT_ID'),
7    getenv('MM_LICENSE_KEY')
8);
The locale parameter already defaults to the array containing only the value
'en' so there is no need to specify it, and the default host for the
constructor will point to the GeoIP City Plus web service, so there’s no need to
specify it either. Now your application will be performing lookups with the more
accurate, paid GeoIP City Plus web service.
Wrapping up
In this blog post, we’ve covered how to use the GeoLite City web service and the GeoIP City Plus web service. I hope you have found it useful and fun. If you have any questions, or want to tell MaxMind about what kind of application you’re running using the GeoLite web services or GeoIP web services, feel free to leave an issue on the repo. Thanks for reading!
